연습겸 정리하는 글 최종 코드는 맨 아래에 올려둡니다!
1. 기본 List를 작성한다
  List<Map<String, String>> buttons = [
    {"치킨": "🍗"},
    {"피자": "🍕"},
    {"감자튀김": "🍟"},
    {"쿠키": "🍪"},
    {"아보카도": "🥑"}
];- List 자료를 활용하여 key값 = 텍스트의 버튼을 만든 후 클릭시 value 아이콘이 뽝! 하고 뜨는 것을 만들고 싶었다
- 먼저 map을 이용하여 button을 생성시켜주면 이런 코드가 나온다
2. map 함수를 이용하여 Button을 만든다
Row(
  children: buttons.map((item) {
    String label = item.keys.first;
    String icon = item.values.first;
    return Container(
      padding:
          const EdgeInsets.symmetric(vertical: 10, horizontal: 10),
      child: ElevatedButton(
        onPressed: () {
          // 버튼이 눌렸을 때 수행할 동작
        },
        child: SizedBox(
          child: Text(
            label,
            style: const TextStyle(fontSize: 18),
          ),
        ),
      ),
    );
  }).toList(),
)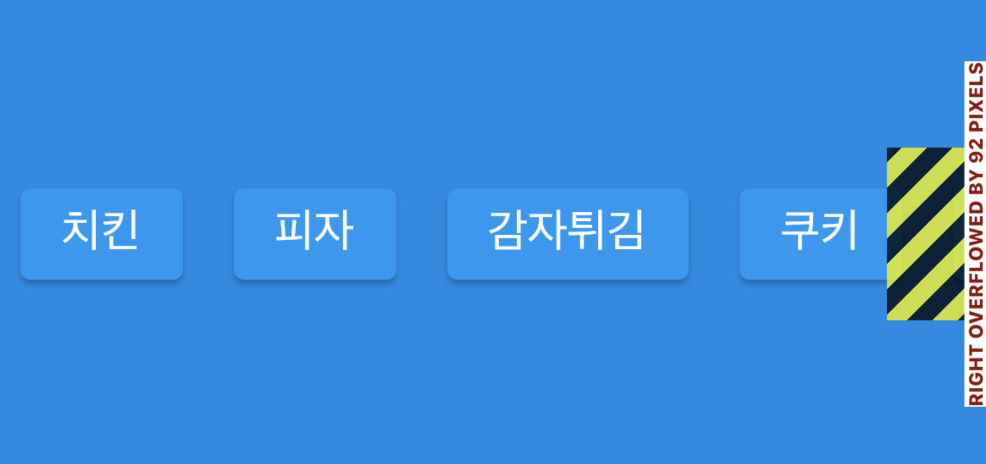
- 해당 위의 코드를 작성하면 Row때문에 버튼이 옆으로 over된다
- 이때 Row 대신 Wrap 태그로 바꿔준다
2-1 Row로 작성했을시 넘치는 layout에 대비하여 Wrap 태그를 사용해준다
Wrap(
  crossAxisAlignment: WrapCrossAlignment.center,
  alignment: WrapAlignment.center,
  children: buttons.map((item) {
    String label = item.keys.first;
    String icon = item.values.first;
    return Container(
      padding:
          const EdgeInsets.symmetric(vertical: 10, horizontal: 10),
      child: ElevatedButton(
        onPressed: () {
          // 버튼이 눌렸을 때 수행할 동작
        },
        child: SizedBox(
          child: Text(
            label,
            style: const TextStyle(fontSize: 16),
          ),
        ),
      ),
    );
  }).toList(),
)
3. 아이콘을 보여줄 Box를 만들어준다
 SizedBox(
  width: 100,
  height: 100,
  child: Container(
    decoration: BoxDecoration(
      color: Colors.white.withOpacity(0.5),
      borderRadius: BorderRadius.circular(100),
    ),
    child: const Center(
      child: Text("아이콘"),
    ),
  ),
),
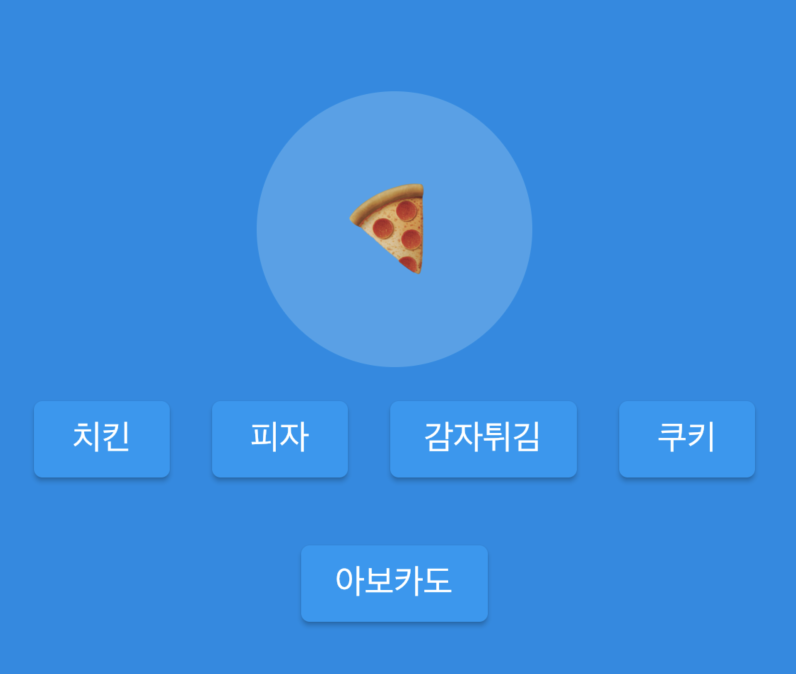
4. 해당 버튼을 클릭시 Text에 해당 아이콘 값을 보낸다
 |
 |
1. 우선 변수 두개를 1. 버튼 클릭을 했냐 안했냐의 bool 값과 2. Icon 문자열을 만들어 준다
bool onSelect = false;
late String _selectedIcon;
2. 버튼을 눌렀을때 수행할 동작을 작성해준다
- 선택값을 true로 바꾸고 _selectedIcon 값을 Item value값으로 넘겨준다
onPressed: () {
// 버튼이 눌렸을 때 수행할 동작
setState(() {
onSelect = true;
_selectedIcon = item.values.first;
});
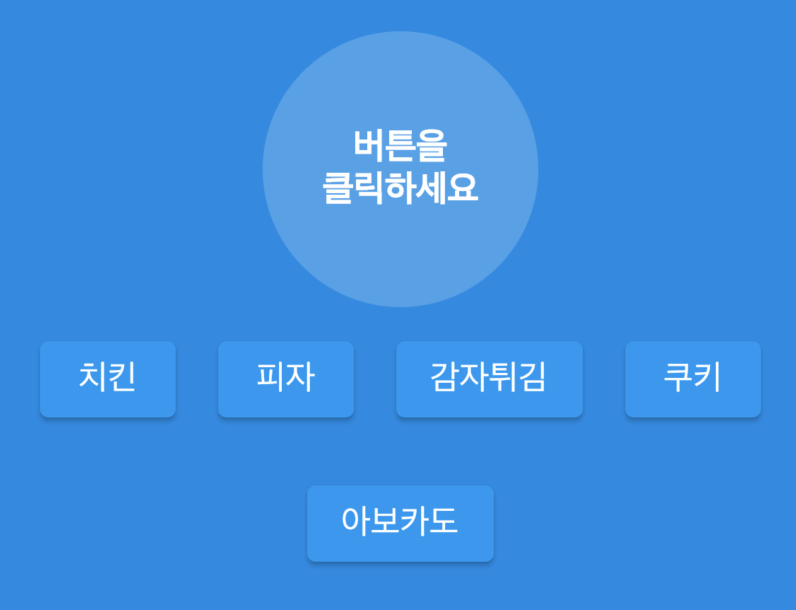
},3. onSelect 가 true 일시 _selectedIcon이 나오고 false 이면 "버튼을 클릭하세요"를 나오게한다
child: Center(
  child: onSelect
      ? Text(
          _selectedIcon,
          style: const TextStyle(fontSize: 44),
        )
      : const Text(
          "버튼을\n클릭하세요",
          textAlign: TextAlign.center,
          style: TextStyle(
              color: Colors.white,
              fontWeight: FontWeight.w600,
              fontSize: 17),
        ),
),
5. 버튼을 디자인한다
- bool 값을 하나 더 추가한다 (선택한 icon value와 버튼 value를 비교해서 같으면 true 다르면 false
bool isSelected = _selectedIcon == item.values.first;- 버튼을 디자인한다
style: ElevatedButton.styleFrom(
  backgroundColor: isSelected ? Colors.indigo : null,
  shadowColor: Colors.transparent,
  elevation: 0.0,
  side: BorderSide(
    width: 1,
    color: isSelected ? Colors.indigo : Colors.white10,
  ),
),
6. 완성

7. 전체코드 보기
더보기
import 'package:flutter/material.dart';

void main() {
  runApp(const App());
}

class App extends StatelessWidget {
  const App({super.key});

  @override
  Widget build(BuildContext context) {
    return const MaterialApp(
      home: HomeScreen(),
    );
  }
}

class HomeScreen extends StatefulWidget {
  const HomeScreen({
    super.key,
  });

  @override
  State<HomeScreen> createState() => _HomeScreenState();
}

class _HomeScreenState extends State<HomeScreen> {
  List<Map<String, String>> buttons = [
    {"치킨": "🍗"},
    {"피자": "🍕"},
    {"감자튀김": "🍟"},
    {"쿠키": "🍪"},
    {"아보카도": "🥑"}
  ];
  bool onSelect = false;
  late String _selectedIcon;
  @override
  Widget build(BuildContext context) {
    return Scaffold(
      backgroundColor: Colors.blue[600],
      body: Center(
        child: Column(
          mainAxisAlignment: MainAxisAlignment.center,
          crossAxisAlignment: CrossAxisAlignment.center,
          children: [
            SizedBox(
              width: 130,
              height: 130,
              child: Container(
                decoration: BoxDecoration(
                  color: Colors.white.withOpacity(0.2),
                  borderRadius: BorderRadius.circular(100),
                ),
                child: Center(
                  child: onSelect
                      ? Text(
                          _selectedIcon,
                          style: const TextStyle(fontSize: 44),
                        )
                      : const Text(
                          "버튼을\n클릭하세요",
                          textAlign: TextAlign.center,
                          style: TextStyle(
                              color: Colors.white,
                              fontWeight: FontWeight.w600,
                              fontSize: 17),
                        ),
                ),
              ),
            ),
            Wrap(
              crossAxisAlignment: WrapCrossAlignment.center,
              alignment: WrapAlignment.center,
              children: buttons.map((item) {
                String label = item.keys.first;
                String icon = item.values.first;
                bool isSelected = _selectedIcon == icon;
                return Container(
                  padding:
                      const EdgeInsets.symmetric(vertical: 10, horizontal: 10),
                  child: ElevatedButton(
                    onPressed: () {
                      // 버튼이 눌렸을 때 수행할 동작
                      setState(() {
                        onSelect = true;
                        _selectedIcon = icon;
                      });
                    },
                    style: ElevatedButton.styleFrom(
                      backgroundColor: isSelected ? Colors.indigo : null, // 빨
                      shadowColor: Colors.transparent,
                      elevation: 0.0,
                      side: BorderSide(
                        width: 1,
                        color: isSelected ? Colors.indigo : Colors.white10,
                      ),
                    ),
                    child: SizedBox(
                      child: Text(
                        label,
                        style: TextStyle(
                          fontSize: 16,
                          fontWeight: FontWeight.w600,
                          color: isSelected ? Colors.white : Colors.indigo,
                        ),
                      ),
                    ),
                  ),
                );
              }).toList(),
            )
          ],
        ),
      ),
    );
  }
}
'기초다지기 > Flutter&Dart' 카테고리의 다른 글
| [dart] 문자열 중복 카운트 구하기 (2) | 2023.04.17 |
|---|---|
| [dart] 언제 list, set, map을 사용해야할까? (1) | 2023.04.17 |
| Flutter Image 이미지 적용하는 법 (0) | 2023.04.11 |
| Flutter 설치 방법 (0) | 2023.04.10 |
| Flutter에 대해 알아보자 (0) | 2023.04.10 |


